-40%
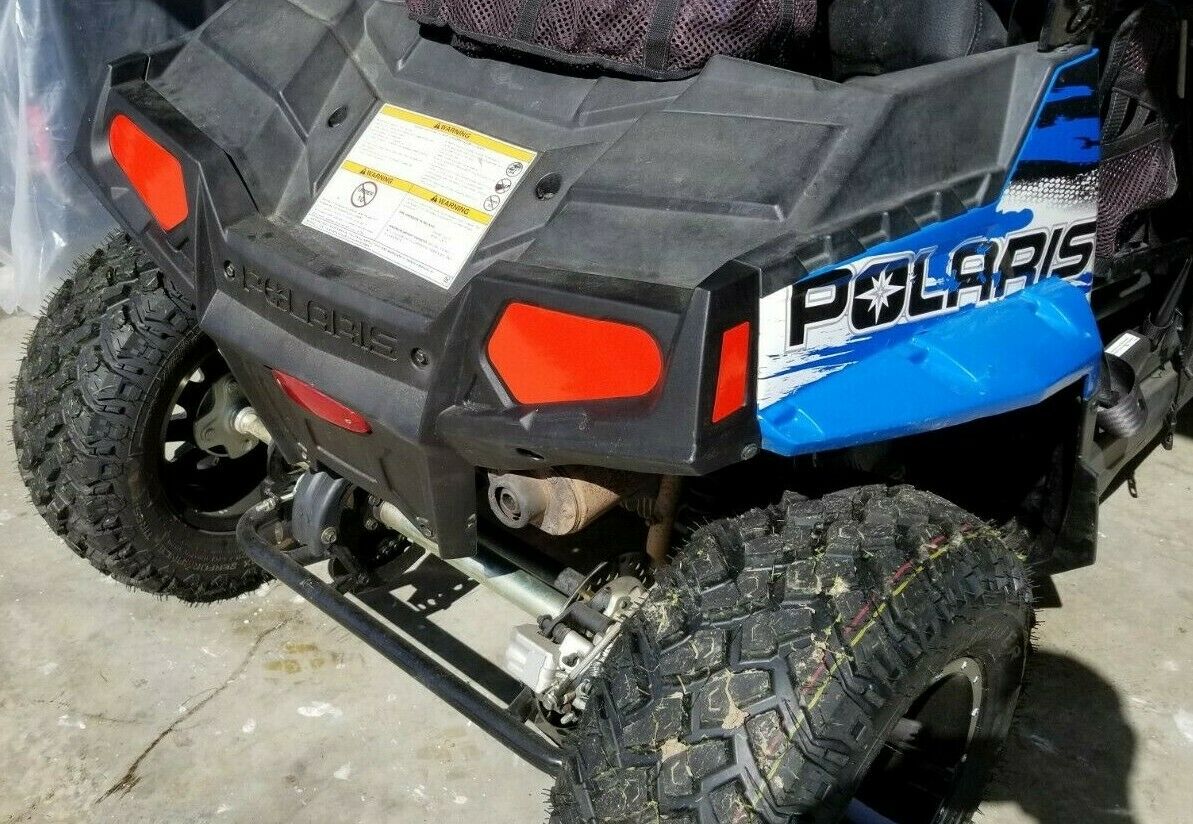
Tail Light & Side Marker RH LH Reflective Body Decal 09-2020 Polaris RZR 170 NEW
$ 13.72
- Description
- Size Guide
Description
You are buying a custom made set of reflective decals for the rear plastic of a Polaris RZR 170.These replace the expensive factory stickers. You get a whole set for the price of one factory decal.
This set consists of 4 pieces that replace the following Polaris part numbers:
2009-2017 Model Years:
7175684 DECAL-TAILLIGHT,LH
7175685 DECAL-TAILLIGHT,RH
7175688 DECAL-REFLECTOR,RED,LH
7175689 DECAL-REFLECTOR,RED,RH
2018-2020 Model Years:
7186929 DECAL-TAILLIGHT,LH
7186930 DECAL-TAILLIGHT,RH
7175688 DECAL-REFLECTOR,RED,LH
7175689 DECAL-REFLECTOR,RED,RH
This is for the rear taillights and side markers stickers only.
These do not look like fake tail lights (like OEM ones). They give a full reflective surface to help safety!
These can be used for other applications if you need reflective surfaces on anything a vinyl decal will stick too. (Trailers, other ATV's, Signs Etc)
Cut, prepared, and shipped from the USA!
Please let me know if you have any other requests for different designs.
These will ship via regular mail in a stamped envelope. Please allow for extra shipping time due to delays with USPS right now. I have added extra handling time even though I ship right away to help account for some delay. eBay does not have proper shipping options or times for this method and is not accounting for delays beyond my control.
Vinyl Decal Application Instructions
Apply Decals in a dry environment with a temperature of at least 55
° Fahrenheit/13° Celsius
Please ask us or refer to the internet or if you have any questions about installing your decal. There are many tutorials available online.
STEP 1:
Clean the area thoroughly with soap and water or rubbing alcohol. It is recommended to do the final cleaning with rubbing alcohol. Do not use Windex or similar product because it will leave a residue. Do not use any other product that may inhibit adhesion of the vinyl.
STEP 2:
Prepare the sticker for application by firmly rubbing the transfer tape with a squeegee, credit card, or similar item. Make sure it does not have sharp edges or you may damage the decal. This will help removed any air bubbles and also ensure the application tape is properly stuck to the decal. The transfer tape may be clear or look like masking tape. This is the tape over the top of your decal. This will pull the decal off the backer and allow you to apply it.
STEP 3:
Peel the backing paper away from the transfer tape/decal slightly. The decal should remain attached to the transfer tape. This exposes the adhesive for application, so be careful at this point. If the decal clings to the backing paper and does not stay adhered to the transfer tape, slowly replace the paper backing and repeat STEP 2.
STEP 4:
Slowly lower the sticker onto the surface and rub it in place firmly with a squeegee or credit card (no sharp edges). You will be rubbing against the transfer tape at this point. This protects the decal. For best results wait 24 hours before moving to the next step. Depending on the size of your decal you may wish to only expose a portion of the sticker and apply it while pulling the backer from beneath to reduce the chance of air bubbles.
STEP 5:
Slowly peel the transfer tape off at an angle. Make sure the decal is not coming off with the transfer paper. If the decal pulls away from the surface, repeat STEP 4.
